Wednesday, July 4, 2012

Gazpacho

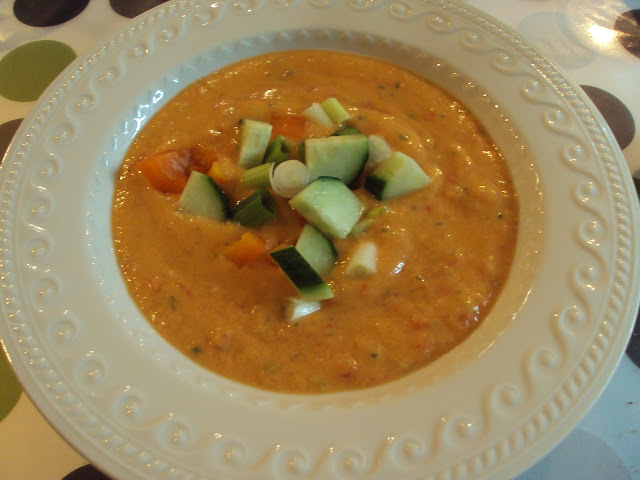
Note: the color of the soup relates to the proportion of ingredients and type of tomato. I put less tomato than desired as well as orange pepper instead of green. The last time I made gazpacho it was much redder in color.

I spent 5 weeks of the summer of 2009 in Spain and fell in love with gazpacho. I lost track of how many times I ate the soup while I was there, but each time it was just as refreshing and delicious as the last. Since then, every time summer rolls around and temperatures creep up to the 100's, I can't help but crave this fresh tomato soup.

Though I would love to claim this recipe I have found as "authentic", every one has their own version, and every region of Spain makes it a bit different. This one is pretty good though, and you can vary the flavor by changing the amount of any basic ingredient--tomato, cucumber, olive oil, onion, pepper--or add something else that you prefer.

This is a recipe for Andalusian Gazpacho, it makes 4 servings.

Ingredients:
1kg tomatoes, plum are best
1/2 small onion (60 g)
1 small green pepper
1 small cucumber
1 small c olive oil (if using a measuring cup, start with 1/2 c, then add more if needed after tasting)
2 t/T red wine vinegar (depending on how much you like vinegar)
200 g day-old bread, soaked in water
salt and pepper, to taste
*1 clove garlic
*1/4 t cumin
Extra of red and green pepper, tomato, cucumber, onion, croutons, cut into small dice, for garnish when serving.

*optional

Combine all ingredients in a blender and blend/pulse until smooth but still thick consistency. Add salt and pepper to taste. Pour into a large bowl and refrigerate at least 1 hour, preferably overnight. The colder the better. Add ice cubes if serving sooner.

Remove from refrigerator and serve immediately, with bowls of vegetables for garnish.

Pain à l’Ancienne

This was the easiest recipe I've made from Peter Reinhart's book yet. It does take 2 days to make, but required no kneading and produces a fantastic bread as long as you are careful not to handle the dough too roughly, causing it to lose precious trapped air.

This makes 6 baguettes.

Ingredients:
6 c unbleached bread flour
1 1/4 t salt
1 3/4 t yeast
*2 1/4 c + 2 T to 3 c ice cold water
semolina flour for dusting

*to ensure the water is ice cold, place it in the refrigerator with ice cubes. Remove the ice immediately before using.

The texture of this dough is very sticky, so it is best if you mix with an electric mixer or food processor. On the first day, combine all the ingredients, using whatever method you choose. Oil a large bowl, transfer the dough, cover with plastic wrap and refrigerate overnight.

The next day, remove the bowl from the fridge and let sit until room temperature and the dough has doubled in size, 2-3 hrs, or more. When this has happened, carefully dump or lift with wet hands, the dough out onto a very floured surface. Flour your hands and shape the dough into a rectangle, 8''x 6''. Mine fell into a shape larger than this, and for fear of handling it too much, I left it alone.

1st four baguettes done, two more still baking
Have a bowl of water sitting on the side, to dip your pastry scraper in. Using this tool, cut the dough in half, and cut each of these pieces in thirds. Flip two baking sheets over and line them with parchment paper covered in semolina flour. Take 3 pieces of dough and put them on the baking sheets, stretching from the ends when you do this so they are the length of the pan. The dough will be very elastic and stretch easily. Let rest 5 minutes, then stretch out again if necessary. Score the dough diagonally if you choose, but this will be difficult since the dough is so sticky.

While the dough is resting preheat the oven to 500 F, with 1 rack in the bottom with a baking stone and 1 rack near the top with a cast iron pan for steaming. If you don't have a baking stone you can bake directly on the sheet. When you transfer to the baking stone, keep the bread on the parchment paper. Have a misting spray bottle with water handy, and 1 cup of boiled water ready to pour into the cast iron pan.

When the oven is ready, put the breads on the stone, pour the water into the cast iron pan and close the door. After 30 seconds mist the oven walls and close the door. Repeat 2 more times at 30 second intervals. After the 3rd spray, lower the oven to 450 F and remove the steam pan. Since these breads are small, they will only take about 8-15 more minutes to bake. They are done when they are golden brown on top.

Immediately transfer to a cooling rack, bake the rest of the dough if it didn't fit, and serve after 30 minutes of cooling.
Detail of the huge air pockets in the dough; it had a great texture and crust.

Sourdough Potato, Cheddar, and Chive Torpedoes

This is the first sourdough bread I've made, and with how perfectly it came out I'm tempted to only make sourdough bread from now on! The crust was thick and crunchy--perfectly complementary to the light and fluffy inside. It had the characteristic sourdough flavor, which will continue to develop as I grow my starter over time, and the chive and cheddar were a wonderful combination in the bread. I also believe the potato added to the lightness and flavor to this bread, and I am curious to try other more traditional sourdough breads to compare.

The bread itself only took 1 day to make, but it took me 5 days to prepare the starter. Four days to prep the seed culture, and 1 day to make the barm, or sourdough starter, which uses seed starter. Once you make the barm, it is refrigerated overnight, then used the next morning in this recipe. Here is a link to a recipe for a simple sourdough starter, since Peter Reinhart's is fairly descriptive and a lot to include here.

Ingredients:
4 c unbleached bread flour
2 small potatoes (~8oz), finely chopped, boiled in 3 c water
1/2 to 1 c potato water, from above
1 1/2 c barm
2 t yeast
2 t salt
6 thin slices sharp cheddar cheese (4 oz)
1/4 c finely chopped chives
Semolina or cornmeal for dusting

Remove the barm from the fridge 1 hr before you are ready to start. At the same time, boil the potatoes in water, and let sit until warm.

In a large bowl mix the barm with 2 c flour, 1/2 c water, the potatoes, and yeast, and let sit 30 minutes.

Add the rest of the flour, salt, and add water as needed as you mix the dough until it forms a ball. Knead for ~6 minutes until everything is evenly distributed. Add the chives and continue kneading for 2 minutes until mixed thoroughly. I kneaded mine an extra 2 minutes until I was satisfied with the texture.

Coat in oil and let rest in a bowl covered in plastic wrap for 90 minutes, until doubled.

After the dough has risen, dump out onto a floured surface and cut into 2 halves. Flatten into 6''x8'' rectangles and lay 3 cheese slices on each, leaving a 1'' border around. Roll up the dough, keeping surface tension as you roll, and gently pinching the ends closed, making sure the push trapped air out when you pinch.

Place the loaves onto a baking sheet lined with parchment paper, dusted with cornmeal or semolina flour. Spray with oil and cover in plastic wrap. Let rise ~1 hr.

When the loaves are almost done rising, prep the oven for hearth baking: 500 F, with steam pan and baking stone on a rack below. Score the loaves diagonally, cutting through to a layer of cheese.

When the oven is preheated, place the bread in the oven on the stone or on the pan, and you can leave it on the parchment paper if you choose. This will protect the bottoms from burning, I have found.

Fill the steam pan with 1 c boiled water and close the door. Open after 30 s and mist the oven. Repeat misting 2 more times, then lower the oven to 450 F and set the timer for 35 minutes. Rotate halfway through for even baking.

Mine took exactly 35 minutes, and at first glance I thought they had cooked too much and were slightly burned, but they actually tasted perfect and I now suspect that I have been taking my bread out a bit too soon. I will experiment with longer baking times.

Let the loaves cool 45 minutes before serving, and enjoy--I'm sure you will with this one!


Mixed ingredients sitting for 1 hr

Finished kneading 
After rising

Before rolling

Before baking

Out of the oven


Sunday, July 1, 2012

Cashew Chicken


I have been eating a lot of nuts lately, and bought a bag of raw unsalted cashews. These are not as tasty as roasted cashews, so I decided to cook with them instead. The first dish that popped into my mind was cashew chicken, and I found a recipe online here. I did not have all the ingredients for the recipe, so I omitted a few things and made a few other minor substitutions. It still came out great and I will definitely be making this again.

This makes ~4 servings.

Ingredients:
1 lb skinless boneless chicken breast, cleaned and cut into 1'' pieces
1 1/2 c fresh snow peas
*1 8oz can water chestnuts
2 medium carrots, julienned or cut into thin slices
1 T sherry or red cooking wine
3/4 t sesame oil (I used orange olive oil)
1 T cornstarch
1/3 c chicken broth, or stock of your choice
1 T rice vinegar
*1 T hoisin sauce
1/2 t minced fresh ginger, or a pinch of dried
2 t canola oil
1/3 c unsalted cashews, toasted
2 c cooked rice

*I did not have this so it was omitted

First, prepare the chicken and place it in a wide bowl for marinating. Mix the marinade in a bowl: 2 T soy sauce, sherry/wine, 1/2 t sesame oil. Pour the marinade over the chicken, stir to coat, and let sit in the refrigerator for 30 minutes.

While the chicken is marinating, prepare the other ingredients. Preheat oven to 350 F and roast cashews for 10-15 minutes, until golden brown. Shake halfway through so they are browned evenly.

Cut the carrots and mix the sauce. For the sauce whisk together cornstarch and broth until smooth. Add vinegar, hoisin sauce, ginger, 1 T soy sauce, and 1/4 t sesame oil.

Preheat a nonstick pan or wok. Add 1 t canola oil. Add the chicken and stir fry until no longer pink. Remove from pan and drain the liquid. Add 1 t more oil and add the snow peas and carrots. Stir fry for a few minutes, then add the water chestnuts. Return the chicken to the pan, add the sauce, and sprinkle with cashews and sesame seeds if using. Remove from heat and stir until the sauce is thick (this should happen almost immediately). Serve over rice.